How to assemble plastic folders
Remove the packaging plastic on the outside of the folder, and place the file parts as shown in the figure. In fact, there is a row of small openings on the side of each part. This is the key. You can check it to facilitate subsequent installation.
Place the two sides neatly, corresponding to the corresponding positions, and connect and install with the bottom part according to the notches on both sides to ensure that the installation is vertical and facilitate the installation in the subsequent steps.
Install the rear parts, place the good parts installed in the front horizontally, from top to bottom along the direction of the slide, slide slowly along the folders on both sides until it touches the bottom of the folder, and the rear completely touches the bottom of the folder. Up to three grooves.
Install the front classification label bar, align the previously secured parts, align the label bar with the slide rails on both sides, and slide from top to bottom to the bottom of the folder.
In fact, there are two slides inside. You can decide whether to add them according to actual needs. The added step is to press the two separating parts in the middle before step 4, and then follow step 4.
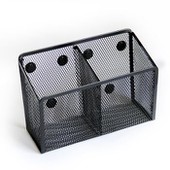
The last step is complete. After the first few steps, a brand new desktop file storage device is installed. You can put a few more to make the desktop more tidy.
If you want to disassemble and take it away, the steps are reverse to the order shown above. You can also increase or decrease the number of intermediate partitions as needed. I hope everyone has a tidy desktop environment.